Stainless steel is an appealing option for everything from accent work to kitchen appliances. It adds a modern twist to architecture and design features, but it also provides durability and functionality to tools and utensils, especially in the food and automotive industries.
It’s not easy to find a material that looks better than stainless steel when it’s polished to a mirror shine. That shimmering, high-gloss look isn’t the only reason people choose stainless steel for everything from refrigerators to auto parts. Many people appreciate that it’s a generally maintenance-free material and happily pay more for the aesthetic appeal.
Stainless steel holds up well against corrosion, high heat, and most chemicals, making it an ideal choice for industrial, commercial, hobby, or residential use. Unfortunately, even though stainless steel is tough, it can still age. You may notice scratches or a dull cast to the pieces over time.
You don’t have to suffer with less than shiny stainless steel, though. While stainless steel is one of the toughest metals to polish, it’s possible to get your items back to their original shine. It doesn’t matter how large or small your project is, you only need to know one basic three-step process for buffing and polishing stainless steel.
How to polish stainless steel in three simple steps:
1. Clean and prep the stainless steel
2. Buff the stainless steel
3. Polish the stainless steel
Step 1 - Clean and Prep Stainless Steel
The first place to start with any corrective project is cleaning the surface. Any leftover debris or residue can make scratches worse, so it’s best to start with a clean slate when learning how to polish stainless steel.
How to Clean Stainless Steel
Use a mild detergent, like dish soap, and a clean sponge to gently clean the surface. Make sure you remove any sticky spots, even if you have to use a soft-bristled brush to clear the gunk off. Do not use steel wool or anything that could damage the stainless steel further.
Rinse the soap off with clean water and dry it with a clean towel. Note that smudges do not matter at this point, you will address those later.
Preparing Rough or Damaged Areas
Pieces with significant mottling or rough edges may need to do some additional prep work before moving on to buffing. Some people like to do an initial once-over with something in the 80 to 120 grit range, especially if you did some welding on the piece or have significant surface damage and gouges. It’s a way to level the surface for a better finish.
Make sure that you clean the piece again before moving on to the next step. Any contaminants left behind could interfere with the final product.
Step 2 - Buffing Stainless Steel
Once you have a clean, dry surface, it’s time to pull out the tools and get to work. The buffing or sanding stage may not be the most fun, but it’s necessary to restore that mirror shine you want.
How to Buff Stainless Steel
Buffing stainless steel is a gradual process that may require a little trial and error on your part. You may be able to handle smaller or narrower pieces by hand, but using a power sander is likely your best bet for achieving an even result.
Start buffing stainless steel with sandpaper between 150 and 240 grit. Many pros suggest going from 240 up to 400, then 600, and finally 1200 grit to round out your progression. You could take things a step further with a 2000 grit sandpaper, but it’s probably only helpful or necessary for a mirror finish.
Set your sander between 4,000 and 6,500 RPM for buffing stainless steel. Be careful to move the sander at a 90° angle to any noticeable scratches. Every time you swap out the sandpaper to a different grit, move 90° from the previous motion.
When you get the stainless steel piece to an even, satiny finish, it’s time to move on. Note that you want to remove any imperfections before moving to the polishing phase to get optimal results.
Why is Buffing Stainless Steel So Important?
If you truly want your piece to shimmer, so clear you can practically see your reflection, then buffing is a necessary step. Especially with food and kitchen items, it can be tempting to take the easy route and just use olive oil or something similar to do a quick polish and call it a day. Unfortunately, that method won’t last, and it won’t correct any scratches.
Consider this: you have a dull, scratched piece of stainless steel. You apply oil or polish by hand that fills in the cracks, including the microscopic ones. That polish wears down quickly, debris gets caught in the crevices, and it takes no time for every scratch to stand out like a sore thumb. Plus, the light reflects strangely off the surface giving it a dull appearance.
Buffing stainless steel allows you to smooth out those scratches and imperfections so that debris can’t collect in the microscopic crevices. The multi-step process slowly smooths imperfections and restores the metal’s best qualities.
Even though buffing is time-consuming, it’s the only way to repair the surface and give you that aesthetically pleasing and durable mirror finish you desire.
How to Get a Matte or Brushed Finish
Depending on the piece, you may not want to spend too much time refining the finish.
A matte finish is like a basic repair. It works for pieces that don’t need to be shiny or attractive but require some work to repair pitting and gouges. Basically, a matte finish is the step before everything looks shiny and new. You can usually get to the matte level with one or two buffing levels, like a 240 grit and then 300 or 400 grit.
A brushed finish is generated with 150 to 240 coated abrasive belts or drums or medium very fine nonwoven abrasives.
A matte or satin finish is generated with a 220 to 240 grit coated abrasive or very fine nonwoven abrasive belt, drum, or disc.
At this point, if you are looking to create a brushed finish, you need to be mindful of the direction you are sanding. If you want a brushed/satin finish with the grain all going in one direction, it is best to use a grinding belt or abrasive drum to set the grain pattern.
The brushed finish is quite common, especially for kitchens and spaces that see a lot of light. Since we don’t love being blinded by our appliances, a brushed finish offers all the shine without the reflection. Unfortunately, it may leave your piece with a little less corrosion resistance, so you may need to apply a rust-proofing finish.
How to Achieve the Mirror Finish
The mirror finish is aesthetically pleasing and masks imperfections from other repairs, like welding. It makes stainless steel extremely shiny and easy to clean. However, that extra shiny finish takes time and effort.
After you finish the buffing process above, prepare to do a few more steps to complete the process. Cut buffing and color buffing use different tools and abrasive compounds to refine the stainless steel further. Note that the more you refine your piece during the initial buffing stages, the less cut buffing you need to do at this phase.

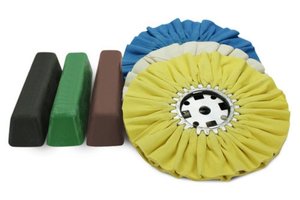
Cut buffing uses a black stainless steel buffing compound that contains an abrasive mineral. The compound removes the extremely fine scratches that you might not notice with your naked eye. We recommend using the blue airway buffing wheel for best results.
Switch gears slightly to a less coarse abrasive. Grab a fresh yellow airway buffing wheel and some brown tripoli compound. Shifting to the brown buffing compound will improve the color to give you a better finish.
Color buffing rounds out the process by pulling out the stainless steel’s brilliance to achieve that mirror-like aesthetic. Using a green rouge compound with a fresh untreated white airway buff should get you a nice, glossy surface.
Take a step back and admire your, almost, reflection in your mirror finished stainless steel.
For your convenience, we have combined all of the products just mentioned into a complete stainless steel buffing kit set.
Buffing Tips and Tricks
Buffing is the most important step in polishing stainless steel to a fine mirror finish. It’s important to take your time and work steadily.
- Be careful not to overdo it when applying the compound to the buffing wheel at each stage.
- Use a gentle hand when color buffing. You do not need to apply much pressure because you’re just finishing the piece off. Use a low speed to prevent an orange peel effect. If you happen to go too heavy with the green rouge compound, simply repeat the process with less pressure and a slower speed.
- Keep tight lines and work them as close together as possible. Try to avoid overlapping too much so that you get an even finish.
- Move quickly over the piece. Be careful not to linger for more than a second or two.
- Have plenty of clean cloths and buffing wheels on hand so that you can swap out every time you change compounds. Avoiding cross-contamination is extremely important, especially when using different abrasives.
Make sure that you always move with the grain and routinely check the piece over for scratches or imperfections before moving on to the next step. While you can revert to an early step at any time, it’s easier and more efficient to check your work as you go.
Step 3 - Polishing Stainless Steel
Polishing stainless steel requires less elbow grease, but possibly a little more finesse. It’s also the highlight of your project because you get to see actual results.
Hand Polishing Stainless Steel
Maybe you used power tools to buff the piece but now you’d like to get down and dirty with the polish and your own two hands. It may even be the best option for smaller pieces that won’t take long.
Carefully clear away any excess compound or debris left behind during the buffing process. You should get a nice sheen with a commercial polish and a clean, dry cloth. Start at one edge and work across the surface in circles, like waxing a car.
When you finish, make sure you wipe away any excess polish with a clean, dry towel.
How to Machine Polish Stainless Steel
Whether you have a larger project or you want an even finish, polishing your piece with a buffing wheel might be your best bet. Knowing how to polish stainless steel with a machine might be more efficient, with a more even result and a shinier outcome.
If you did the buffing stage correctly, including cut and color buffing, your piece should look pretty fine already. However, the compound you used left something behind that blocks some of the shine, so you need to remove it.
Grab a quality stainless steel polish and a polishing wheel or buffing pad. Go over your piece for five or ten minutes to remove residual compounds and anything else left behind. Don’t forget to wipe away any excess polish.
No matter which finish you chose, the final product should look shiny and new with no more blemishes or notable streaks.
