Taking down a heavy weld shouldn't eat up your inventory of flap discs. If it feels like your operators are spending more time swapping out loaded or worn abrasives than they are actually grinding, your post-weld sequence is broken.
Stop Burning Through Discs on Heavy Stock Removal
When you're facing a thick weld bead or heavy slag, the goal is fast, aggressive stock removal. The common go-to tool for this is a hard grinding wheel. For taking down the bulk of a weld, a 1/4-inch Type 27 depressed center grinding wheel is a workhorse. It hogs off material and can take a huge amount of pressure and abuse, which is exactly what you need for the initial knockdown.
But a hard wheel isn't always the most efficient choice. They generate significant heat and vibration that slows you down and causes operator fatigue. For a faster cut with a much smoother feel, switch to a 36-grit or 40-grit ceramic fiber disc on a rigid backing pad. The ceramic grain is self-sharpening...it micro-fractures under pressure to constantly expose fresh, sharp cutting points. This lets it slice through metal instead of plowing, leading to a faster, cooler cut. You’ll feel the difference immediately: less chatter and a quicker finish, which adds up to real cost savings on a production floor.
⚠️ Whatever you choose, never use a thin cut-off wheel for grinding welds. They are only designed for cutting and are not built to handle any lateral pressure. Using one for side grinding can cause the wheel to shatter violently.
Weld Blending: Getting to Base Metal
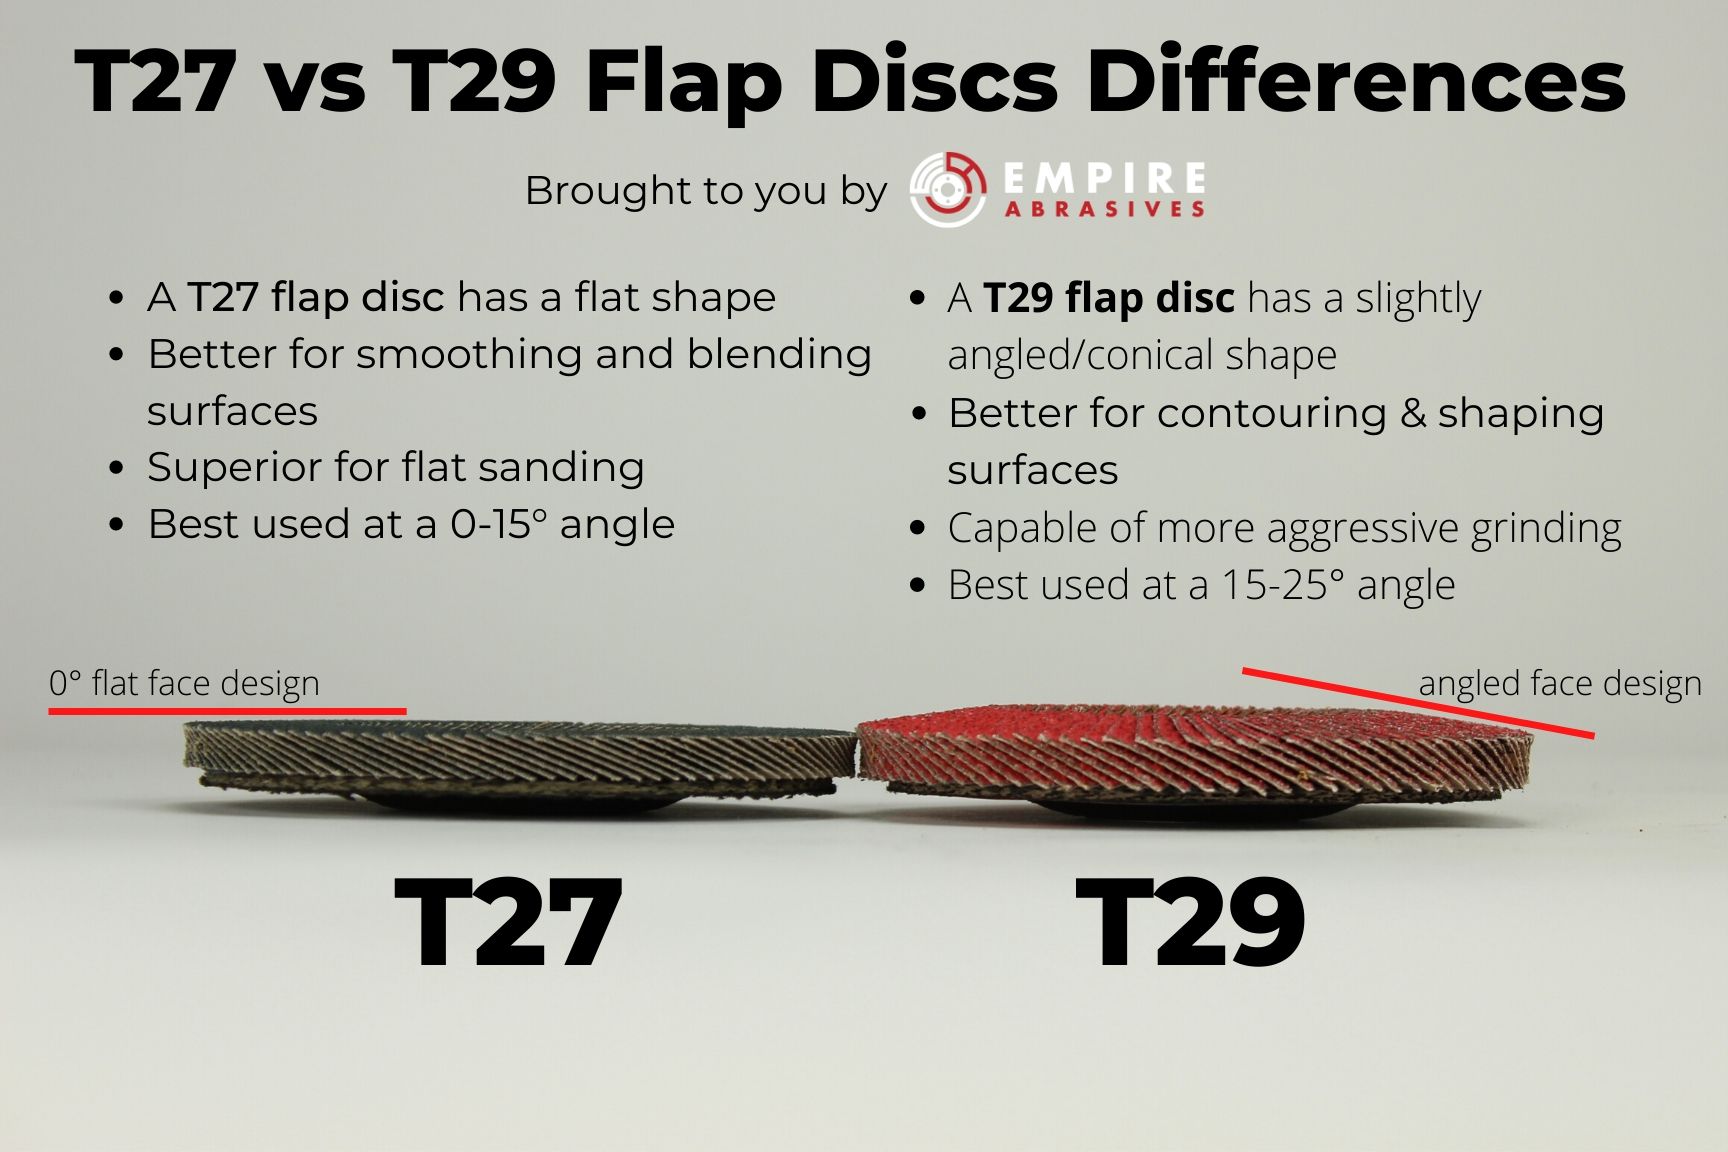
When to Use T27 vs. T29 Flap Discs
Once the weld is knocked down close to the base metal, you switch from your hard grinding wheel or fiber disc to a flap disc. This is where you make or break the finish. The goal is to get that weld perfectly flush with the base metal, but it's easy to dig in too deep or leave behind a nasty heat tint if you're not careful. For carbon or stainless steel, your go-to should be a 40-grit or 60-grit ceramic or zirconia flap disc. Standard aluminum oxide discs will just burn up and glaze over under the pressure of weld blending, forcing you to change discs more often and costing you time and money.
Choosing the right shape flap disc for your application is important. A T29 flap disc has a conical shape, with its abrasive flaps angled downwards. You'll use this disc at a steeper work angle, around 15 to 25 degrees. This angle concentrates grinding pressure on a smaller contact area, making it more aggressive for faster blending. The T29 is the right choice for rapidly feathering the edges of the ground weld and is particularly effective on contours and fillet welds.
For the final pass on flat surfaces, a T27 flap disc is the better tool. Its flat profile is designed for a shallow work angle of 0 to 15 degrees. This gives you a broader contact patch, spreading the pressure out for a smoother, more controlled finish. Using one of our T27 ceramic flap discs helps eliminate the risk of digging into the parent metal and leaves a uniform surface ready for painting or finishing. A typical workflow for a perfect blend is to use a 40-grit T29 for the main blending, followed by a 60- or 80-grit T27 to erase the scratch pattern and create the final finish.
Spatter Removal and Surface Prep
After you've blended the weld, the final post-weld cleanup addresses spatter and any heat discoloration. Using a hard grinding wheel to knock off spatter is a common mistake that will cost you time. A hard wheel is too aggressive for this task and will almost certainly gouge the base metal, forcing you to go back and repair the surface you just finished blending.
Instead, for fast removal of weld spatter and slag, mount a knotted wire wheel on your angle grinder. The stiff, twisted wire knots are tough enough to violently chip off hardened spatter but have enough give that they won't dig into the parent material. Knotted wire wheels make quick work of this cleanup step without creating more repair work for you.
When using wire wheels or brushes on an angle grinder, always verify that the abrasive's maximum RPM rating meets or exceeds your grinder's RPM. Exceeding the brush's stated RPM can lead to dangerous wire shedding.
The last step is dealing with the blue or brown heat tint left from the welding heat, or just prepping the entire area for paint. A coarse or medium grit non-woven surface conditioning disc is the right tool here. Its open, web-like structure cleans the surface and removes discoloration without removing significant stock. This scuffs the metal just enough for good paint or powder coat adhesion, all without altering the dimensions of your workpiece. It’s the final touch for a professionally finished weld.
Material-Specific Weld Grinding Rules
The abrasive that works on a carbon steel I-beam will ruin a stainless steel sanitary weld. Using the right disc for the material isn't just about finish quality; it's about preventing rework and maintaining the integrity of the base metal. You must keep your abrasives segregated by material type.
Stainless Steel
Cross-contamination is one of the biggest risks with stainless. Using an abrasive that's has any unalloyed iron particles on it will embed them onto the surface, causing it to rust. Dedicate a set of abrasives for stainless only—look for discs marked contaminant-free or INOX, which contain less than 0.1% iron, sulfur, and chlorine. You also need to manage heat. Too much pressure can warp thin stainless and ruin its corrosion resistance. A lighter touch with a sharp ceramic grain cuts cooler and prevents this damage.
Aluminum
Grinding aluminum is all about avoiding loading. The metal’s low melting point means friction from a standard abrasive will instantly clog the disc. A loaded disc stops cutting and just smears molten aluminum across your workpiece. To prevent this, you need an abrasive made for non-ferrous metals. These feature an open-coat grain structure for chip clearance and a waxy stearate coating that acts as a lubricant. This combination is essential for a clean cut without ruining discs.
Carbon Steel
With carbon steel, you want to consider efficiency and cost-per-weld. A cheap aluminum oxide disc works, but it dulls quickly under pressure, forcing frequent disc changes. For any production shop, a zirconia or ceramic abrasive is the smarter investment. The self-sharpening grain provides a much longer life and a faster cut rate, which directly reduces labor time and your total spend on consumables.
Finishing Fillets and Tight Access Welds
Angle grinders can't reach into tight inside corners or follow the curve of a fillet weld. For these tight access jobs, you need to switch to a die grinder. The smaller profile of the tool lets you get into spaces that are otherwise impossible to finish properly.
When you need to knock down a heavy bead inside a corner, nothing beats a carbide burr. A double-cut burr gives you fine chips and great control, letting you remove the weld material precisely without accidentally gouging the parent metal. A cylindrical or tree-radius burr shape often fits perfectly into these tight geometries.
For blending that ground-down weld, you need an abrasive that can conform to the fillet's radius. This is where tools like cartridge rolls or spiral bands on a drum mandrel excel. They have just enough give to follow the curve and create a smooth, blended transition. Small-diameter flap wheels also work well here, especially mini curved edge flap discs. The key is matching the abrasive diameter to the weld geometry. We recommend starting with an 80-grit cartridge roll to remove the marks from the burr and prepare the surface for its final finish.
Surface Conditioning and HAZ Finishing for Stainless Steel
That blue and brown heat tint around your stainless weld isn't just cosmetic. This Heat-Affected Zone (HAZ) has a compromised passive layer, meaning its corrosion resistance is reduced. To restore it, you have to mechanically remove that thin, discolored surface.
A hard wheel or flap disc is far too aggressive for this; you'll remove too much stock and ruin the finish. The right tool is a medium-grit non-woven surface conditioning disc. Its open, web-like structure gently scours away the heat tint and blends the surface without digging into the base metal. This step effectively restores the protective properties of the stainless steel and prepares it for the final finish.
To achieve a professional #4 brushed finish, run the disc over the workpiece in a single, consistent direction. This creates the uniform linear scratch pattern you're looking for. For any work on stainless, you must use a dedicated, contaminant-free disc. If your surface conditioning disc has ever touched carbon steel, it will embed iron particles and cause rust spots on your otherwise finished product, forcing you to do the work all over again.
Further Reading
From Empire Abrasives
-
Flap Disc Variations: The Best Specialty Discs for Grinding, Blending, and Polishing — Explore specialty flap discs designed for specific grinding, blending, and polishing tasks.
-
Flap Discs vs Grinding Wheels: A Side-by-Side Comparison for Better Tool Selection — Get a direct comparison between flap discs and grinding wheels to choose the right abrasive for your job.
-
7 Ways Abrasives Enhance Welding & Fabrication Part 2 Weld Grinding Cleaning Buffing & Surface Prep — Learn how abrasives apply to various post-weld processes including grinding, cleaning, buffing, and surface preparation.
-
Flap Discs Uses and Differences Guide for a Great Multi-Tool — Understand the various applications and key differences between flap disc types for versatile use.
-
Troubleshooting Common Abrasive Tool Issues - Grinding Wheels for Angle Grinders — Identify and fix common problems encountered when using grinding wheels with angle grinders.
External Resources
-
Iron Residue Contamination (Stainless Foundry) — Understand how iron residue can contaminate stainless steel and the resulting implications for the material.
-
What Does Discoloration Mean in Stainless Steel Welding? (The Fabricator) — Learn what weld discoloration indicates for the compromised passive layer of stainless steel and its corrosion resistance.
About the Author
Mike Germade
Mike is the Content Specialist for Empire Abrasives, where he has spent over five years researching and writing expert resources on sanding, grinding, and polishing tools. He regularly tests products on his own woodworking and metalworking projects, combining hands-on experience with a passion for clear content that helps makers and DIYers succeed. He continually updates his work to reflect the latest products, safety standards, and industry best practices.
Last Update: 4/3/2026