
Key Takeaways
- ✓ Can You Sand Metal? Yes, sanding is essential for removing rust, old paint, and rough edges, as well as preparing metal for a new coating.
- ✓ Key Tools: You will need an abrasive tool (sandpaper, sanding discs, etc.), a sander (power or hand), and safety gear (goggles, mask, gloves).
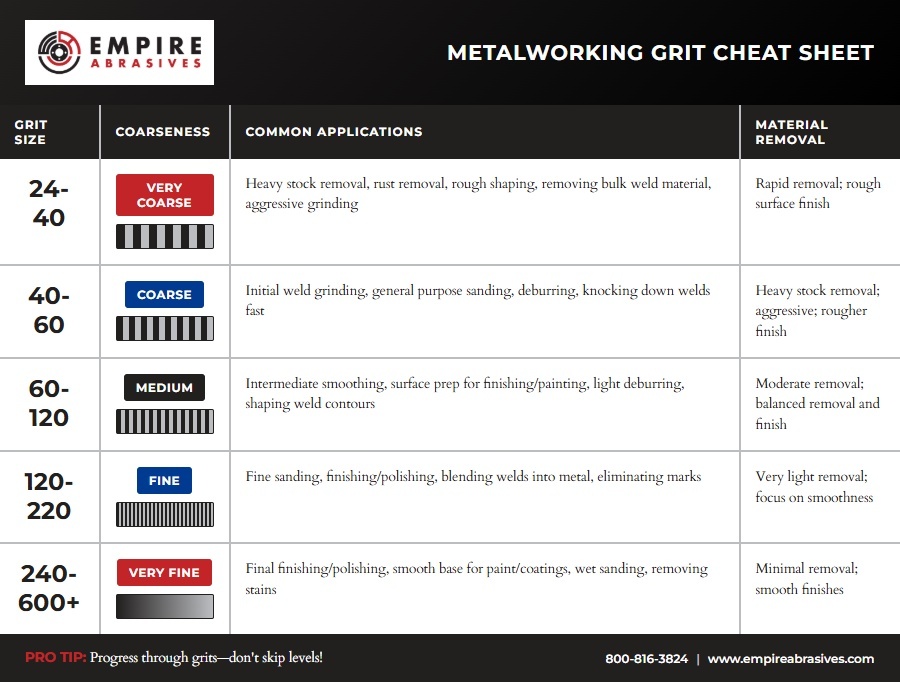
- ✓ Grit Progression: Always start with a coarse grit (like 60-80) to remove material and work your way up to finer grits (like 220-400+) for a smooth finish.
- ✓ The Golden Rule: Never skip grits. Each grit's job is to remove the scratches from the previous one.
- ✓ Can regular sandpaper be used on metal? No. Wood sandpaper will clog quickly on metal and wear out fast. For best results, use metal-rated abrasives with stronger backing and appropriate grain adhesion.
- ✓ Grinding vs Sanding: Grinding (under 60 grit) is for aggressive material removal (like welds/rust). Sanding (60+ grit) is for finishing, smoothing, and preparation.
Introduction: Why Sanding Metal is a Critical First Step
Whether you're restoring a rusty piece of patio furniture, prepping a car for paint, or smoothing a rough weld, sanding is the non-negotiable step that separates an amateur job from a professional finish. But if you're new to metalwork, you might be asking, "Can you sand metal like you sand wood?"
So, can you sand metal? Absolutely. In fact, it's the critical first step for almost any metal project. Sanding does three essential jobs:
- Removes Imperfections: It strips away rust, old paint, pitting, and corrosion, revealing a clean, workable surface.
- Creates a "Tooth": On a microscopic level, sanding creates fine scratches. This "tooth" gives primer and paint something to grip, ensuring a durable bond that won't chip or peel.
- Deburrs & Finishes: It removes sharp, hazardous edges (called "burrs") left over from cutting or creates a beautiful, decorative "brushed" look.
In this guide, we'll cover the exact tools, abrasives, and step-by-step techniques you need to sand any metal like a pro.
Pre-Sanding Essentials: Preparation for a Flawless Finish
Before you get into the actual sanding process, there’s a bit of prep to do.
Pre-Sanding Step 1: Surface Inspection and Cleaning
- Identify Your Metal: Different metals have unique properties. For example, aluminum is soft and scratches easily, while steel is much tougher. Knowing what your material is will help you choose the right abrasives and techniques.
- Thorough Cleaning: Start by wiping away any loose dirt and debris. Next, wash the entire surface with a solution of mild soap and water, or a dedicated degreaser, to remove all traces of oil, grease, and other contaminants. Sanding over these contaminants embeds grime into the metal's surface and prevents paint or primer from forming a proper bond.
- Completely Dry: The metal needs to be completely dry before you begin sanding. Any moisture, especially on ferrous metals like steel, can cause new rust to form almost immediately.
Pre-Sanding Step 2: Removing Heavy Rust and Old Coatings
For surfaces with rust, scale, or multiple layers of paint, removing this now will be much more efficient than starting with sandpaper alone. Your goal here is to strip away the bulk of the unwanted material before proceeding to finer sanding.
- Wire Brushes: Mounted on a drill or angle grinder, wire brushes are great tools for removing loose rust, flaking paint, and mill scale. They are available in two main types: crimped wire brushes are more flexible and less aggressive, making them good for general cleaning, and knotted wire brushes are stiffer and more aggressive for heavy-duty cleaning and weld spatter removal. [Shop for Wire Wheels & Brushes]
- Flap Discs: A versatile abrasive, flap discs excel at removing rust and old coatings. They offer a great balance of material removal and initial blending, making them a popular choice for surface restoration. [Shop for Flap Discs]
- Strip Discs: Designed specifically for removing paint, rust, and oxidation without damaging the base metal. Made from open-web, non-woven fibers, they run cooler and resist loading better than traditional abrasives. Ideal for prepping metal surfaces before sanding, welding, or refinishing. [Shop for Strip Discs]
Grinding Metal vs. Sanding Metal: What's the Difference?
These terms are often mixed up, but they mean different things.
- Grinding: This is aggressive removal. It uses low-grit abrasives (like 24, 36, or 60 grit) on tools like an angle grinder to remove a lot of material quickly (grinding down a weld or thick rust removal).
- Sanding: This is for finishing and finesse. It uses higher-grit abrasives to smooth the surface, prep it for paint, or polish it.
Selecting Abrasives and Sanders for Metal
The tools you choose for sanding metal will depend on the type of metal and the type of project you’re working on. A large rusty car hood requires a different approach than sanding a delicate piece of aluminum trim. Here’s a breakdown of what you'll need.
1. The Abrasive Choices (The "Sandpaper" Itself)
Can you use regular sandpaper on metal? This is a common question we often get, and the answer is no. Standard "wood" sandpaper (often reddish-brown and made of garnet) is too soft for metal sanding. It will clog and/or wear out fast, and won't be effective on hard surfaces like steel. For metal, you need specific abrasive grains that are properly bonded to a stronger backing.
Abrasive Grain Types:
The grains are the small minerals that coat your abrasives and do the cutting and sanding. Different grains have different properties, making them suitable for different applications
| Abrasive Grain | Primary Application & Best Metal Types | Key Advantage in Sanding | Wet Sanding / Polishing Suitability |
|---|---|---|---|
| Aluminum Oxide (AO) | General Smoothing & Prep Hard Ferrous metals (Steel, Iron), Non-ferrous metals (Aluminum, Brass). |
Highly versatile, durable, and cost-effective for general sanding and finishing. Self-renewing action maintains sharpness. | Used extensively in fine grits (220-600+) for finishing and polishing. |
| Silicon Carbide (SiC) | Fine Finishing & Polishing Softer metals (Aluminum, Brass). Also tough alloys and hardened steels. |
Sharper grains cut aggressively and efficiently. Ideal for wet sanding because it commonly comes with waterproof backing, reducing dust and heat buildup. | Recommended for producing smooth finishes and is the most used abrasive grain for wet sanding. |
| Zirconia Alumina (Zirc) | Aggressive Blending & Smoothing Harder metals (Stainless Steel, Carbon Steel). Excellent for heavy sanding of rust. |
Superior durability and wear resistance compared to AO. Used effectively in coarse/medium sanding steps (e.g., 80-120 grit) for fast stock blending. | Not ideal for final polishing. Its high-pressure requirement can cause gouging on soft metals like aluminum. |
| Ceramic Alumina (Ceramic) | Precision Finishing & Heat-Sensitive Sanding Hard and heat-sensitive metals (Stainless Steel, Titanium Alloys, Tool Steel). |
Longest lasting abrasive. Provides a cooler and more consistent sanding experience, which is crucial for precision work and avoiding thermal damage. | Better suited for final polishing applications compared to Zirconia. Can be formulated into belts suitable for wet sanding applications. |
Abrasive Forms (The "Shape"):
- Sanding Discs: 5" or 6" discs for orbital or "DA" sanders. Best for creating a smooth, swirl-free finish on flat, large surfaces (like a car hood).
- Sanding Belts: For belt sanders (handheld or benchtop), used for aggressive material removal and shaping.
- Sheets & Sponges: For hand sanding. Sponges are a must-have for getting into tight corners, channels, and sanding curved profiles.
- Longboard Sanding Sheets: The go-to for auto-body work. Used on a longboard sander (manual or pneumatic) to level body filler and find high/low spots on large, flat panels.
2. The Tools (The Power)
Tool Breakdown:
- Hand Sanding: Offers the most control and is best for small, intricate, or curved surfaces where a power tool might be too aggressive. Tools like sanding sheets, shop rolls, and sanding sponges are ideal for hand sanding. Using a sanding block is recommended for distributing pressure evenly.
- Power Sanders: For larger surfaces, a power sander is the most efficient choice.
- Random Orbital Sander (Palm Sander): A must-have for paint prep. The random motion ("orbital") creates a uniform, swirl-free finish on flat surfaces.
- Belt Sander: A powerful and aggressive sander, best used for quickly removing material from large, flat surfaces.
- Longboard Sander: The essential tool for auto-body work to get panels perfectly flat and "true" before painting.
- Detail Sander: Also known as a corner or mouse sander, this tool is designed for getting into tight corners and small, hard-to-reach areas that other sanders can’t.
3. Essential Safety Gear (PPE)
This is not optional. Metal particles are sharp and hazardous to your health.
- Safety Glasses/Goggles: Protect your eyes from flying metal fragments.
- Dust Mask or Respirator: Metal dust is extremely harmful to inhale. Always wear at least an N95 mask.
- Gloves: Protect your hands from sharp metal edges, friction, and heat.
How to Sand Down Metal: Step-by-Step Metal Sanding Techniques
Now that you’ve prepped your metal for sanding and put together the right tools for your project, it’s time to get into the sanding! Using the right technique is what will separate an amateur finish from a professional one.
Follow these steps for a perfect finish every time.
Dry Sanding Metal
- Step 1 - Put On Your Safety Gear: Before you do anything, put on your safety glasses, mask, and gloves.
- Step 2 - Clean and Prep the Metal Surface: Just a reminder in case you skipped to this part of the article. Clean contaminants from the surface using water + a mild detergent or a degreaser. Let it fully dry. Remove any rust or old coatings.
- Step 3 - Start with the Coarsest Grit Necessary: Identify your goal. For heavy rust or paint, grab that 60 or 80-grit flap disc or sanding disc. Start with the lowest grit you need to remove the worst of the damage.
- Work in a Consistent Motion: Keep the sander moving to avoid creating dips or hot spots. If you're hand sanding, sand in one direction. If you're using an orbital sander, the tool will do the work for you.
- Pro Tip: Let the tool do the work. Don't push down hard. Applying heavy pressure only creates excess heat, gouges the metal, and wears out your abrasive faster.
- Step 4 - Wipe and Inspect: Wipe the dust away with a clean cloth. This removes the abrasive particles and metal dust that could get trapped and create new, deeper scratches when you move to a finer grit.
- Step 5 - Move to the Next Grit & Change Sanding Direction: If your inspection shows a uniformly scratched surface it’s time to progress to your medium grit (e.g., 120). The goal of this new grit is to remove the scratches from the previous grit. With each new grit, change your sanding direction by 90 degrees (horizontal to vertical / vertical to horizontal). This makes the previous, coarser scratch pattern stand out so you can see exactly when it has been fully erased
- The "Golden Rule of Sanding”. If you jump from 80-grit to 220-grit, the 220-grit isn't coarse enough to remove the deep 80-grit scratches, and they will show up under your new paint
- Step 6: Repeat Until Smooth: Repeat the process. Wipe the surface, inspect it, and move up to your next fine grit (e.g., 220 or 320). The surface should now feel smooth to the touch, and ready for primer.
- Step 7: Final Clean-Up: Wipe the surface with a tack cloth or a clean rag with denatured alcohol to remove all fine dust particles. Your metal is now perfectly prepped for painting
Advanced Technique: Wet Sanding
Wet sanding is a finishing technique that uses water or another lubricant to achieve an exceptionally smooth, pre-polish finish. This sanding technique removes minor defects, improves shine, and prepares metal for polishing. It reduces material removal and prevents abrasive loading by using water as a lubricant and flushing away debris.
- When to Wet Sand: Wet sanding is typically reserved for the final finishing stages, using fine to ultra-fine grits (400 and higher). It is especially critical when preparing a surface for a high-polish or mirror finish on metals like aluminum and stainless steel.
- Required Materials: This technique requires waterproof sandpaper, which is most commonly made with a silicon carbide abrasive grain.
- The Process: Lightly spray both the metal surface and the sandpaper with water. Use light, consistent pressure as you sand. Frequently wipe away the "slurry" (the mixture of water and fine metal particles) to check your progress and keep the surface clean.
For a full guide check out - How to Wet Sand Metal Surfaces – A Step-by-Step Guide
From Paint Prep to Mirror Polish: Pro-Tips for Common Metal Sanding Projects
The sanding process needs to match what you want to achieve. Getting metal ready for paint requires a different surface than preparing it for a shiny, mirror-like finish. Also, different metals have special qualities that need specific methods and types of sandpaper. This section offers specific advice for common types of metal and what you hope to accomplish.
How to Sand Different Metal Types
Sanding Aluminum:
It's a soft metal and clogs sandpaper easily. Use stearated aluminum oxide or silicon carbide abrasives to resist loading. A quick spray of WD-40 or water (if not painting) helps reduce buildup. Clean clogged discs with a rubber sandpaper cleaning stick.
Sanding Brass & Copper:
Soft, ductile metals that scratch easily. Use fine-grit silicon carbide (220–600) and light pressure. Wet sanding prevents loading and streaking. For a bright finish, follow with a buffing compound.
Sanding Carbon & Alloy Steel:
Hard and durable but prone to rust and heat warping. Use aluminum oxide for general work and zirconia or ceramic for heavy stock removal. Keep the sander moving to prevent overheating, and coat or paint the surface promptly after sanding to avoid flash rust.
Sanding Stainless Steel:
Extremely tough and heat-sensitive. Use ceramic or zirconia abrasives and work in small sections to prevent heat buildup. To create a "brushed" finish, hand-sand only in one direction with the grain. Always use dedicated abrasives to avoid cross-contamination and after-rust. Avoid using steel wool which is usually made of carbon steel that will embed iron particles that will rust. Use Premium/High Quality Abrasives. Stainless steel's toughness will destroy cheap abrasives.
Sanding Cast Iron:
It's strong but brittle. Use an aggressive grit (60-80) to remove rust, but don't apply too much pressure or heat, which can warp or crack the iron.
How to Sand Metal for Painting (Auto Body or Furniture)
- Goal: A perfectly smooth surface with a "tooth" for primer.
- Best Tool: Dual-Action (DA) or Orbital Sander.
- Technique: Start with 80-120 grit to remove old paint/filler. Feather the edges. Finish with 220-320 grit for the final primer-ready surface.
- Product Rec: 6" DA sanding discs w/gold stearate
How to Sand Metal for a Mirror Finish
- Goal: Achieve a flawless, reflective “chrome-like” finish with no visible scratches.
- Best Tool: Hand sanding with a block or random orbital sander
- Technique: Start with a clean, smooth base. Progress through grits up to at 2000 grit, using wet sanding paper. Use a non-woven abrasive then a felt or cotton buffing wheel with cutting compound (brown/tripoli) followed by polishing compound (white rouge). Finish with a light coat of wax, sealant, or metal polish to slow oxidation.
- Product Rec:
- High Grit Wet/Dry Sandpaper - for hand sanding
- 6” PSA Green Film Sanding Discs - for power sanding
- Buffing Kit - buffing wheels and compound
The 5 Most Common Metal Sanding Mistakes (and How to Avoid Them)
- 1. Skipping Grits: This is the biggest mistake. It's tempting to jump from 60-grit to 220-grit, but it will leave deep scratches that your paint will highlight.
- 2. Applying Too Much Pressure: This gouges the metal, creates heat (which can warp thin panels), and wears out your abrasive disc in half the time. Let the tool and the grit do the work.
- 3. Using the Wrong Abrasive: Using wood sandpaper on steel. It's a waste of time and money. Use an abrasive grain made for metal.
- 4. Forgetting to Clean the Surface: Sanding over grease or oil just contaminates your abrasive and pushes the grease into the metal, which can cause paint to fail later.
- 5. Ignoring Safety Gear: Metal dust is bad. Flying wire brush bristles are worse. Be safe.
Recommended Abrasives for Your Toolbox
Recommended Abrasives: Preparation Phase
| Tool Type | Primary Application | Expert Advice & Reasoning |
|---|---|---|
| Wire Brushes | Heavy Rust, Scale, and Slag Removal | Knotted brushes aggressively removes thick corrosion and scale. Nylon wire is safer for light deburring or non-marring rust removal, preserving the base material. |
| Resin Fiber Discs (RFDs) | Extra Heavy Deburring & Grinding | These discs are stiff, single-layer abrasives designed for aggressive, economical grinding and stock removal. |
| Easy Strip & Clean Discs / Drums | Rapid Paint, Filler, and Rust Stripping | Made for removing coatings quickly without damaging the underlying metal. They resist loading with paint and are a safer alternative to wire brushes. |
| Flap Discs (T29 Conical) | Thick Coating and Rust Removal | Flap discs offer a strong balance of removal and initial blending. The conical (T29) shape allows for aggressive material removal in this early stage. |
Recommended Abrasives: Sanding & Blending Phase
| Tool Type | Primary Application | Expert Advice & Reasoning |
|---|---|---|
| Quick Change Discs (Coated) | Precision Grinding in Tight/Contoured Areas | Small (2" or 3") discs used on a die grinder for tight access. Ceramic is preferred for heavy stock removal in these confined spaces due to its performance. Requires a backing pad. |
| Sanding Belts (2"x72", etc.) | Aggressive Shaping & Bevel Grinding | Ceramic belts are the top recommendation for aggressive steel removal, such as profiling and bevel grinding in knifemaking. Zirconia is highly durable for general metal and hardwood shaping. |
| Gold Sanding Discs | Medium-to-Fine Finishing (Dry Sanding) | A workhorse for general-purpose sanding and paint prep. The stearate coating minimizes clogging while maintaining consistent cutting action—ideal for smoothing bare metal or primer. |
| Gold Longboard Sandpaper | Large Flat Panels & Auto Body Surfacing | Designed for use with longboard sanders to level filler and feather paint edges. The uniform grain and anti-load coating deliver a consistent scratch pattern across large surfaces. |
| Sandpaper Sheets | Hand Sanding, Touch-Ups, and Edges | Perfect for small or contoured areas where power tools can't reach. Available in a wide range of grits for both material removal and fine finishing. Use with a sanding block for even pressure. |
Recommended Abrasives: Finishing & Polishing Phase
| Tool Type | Primary Application | Expert Advice & Reasoning |
|---|---|---|
| Green Film Sanding Discs | Fine Finishing & Wet Sanding | Premium waterproof discs for both wet and dry sanding. The tear-resistant film backing ensures uniform finish quality and extended life, making them ideal for mirror-polish prep. |
| Green Film Longboard Sandpaper | Final Finishing of Panels and Bodywork | Combines longboard reach with film durability. Maintains consistent scratch depth even under wet conditions—essential for final prep before painting or clear coat. |
| Wet/Dry Sandpaper Sheets | Ultra-Fine Finishing & Polishing | Made with silicon carbide for sharp, clean cuts when wet sanding. Use grits 400-2000+ to remove micro-scratches and oxidation, preparing metal for buffing or a flawless paint finish. |
| Surface Conditioning Products | Satin Finish, Blending, & Deburring | These products clean, finish, and blend without altering the metal's dimensions. They are ideal for creating a uniform brushed look and removing heat discoloration on stainless steel. |
| Felt Polishing Discs | Preparation for Mirror Polishing | Felt discs are non-abrasive carriers, designed to be used only with a buffing compound for the final high-gloss or mirror finish. |
| Buffing Wheels & Compounds | Achieving a High-Gloss or Mirror Finish | Use a coarse compound (e.g., Black Emery for steel or Brown Tripoli for aluminum) on a stiff Sisal or Treated Airway Buff to remove scratches first. Follow with fine compounds (e.g., Green/White Rouge) on a soft, untreated wheel for the final high luster. |
Frequently Asked Questions (FAQ)
What grit sandpaper should I use to start sanding metal?
For removing heavy rust or old paint, start with a coarse grit like 40-80. For general smoothing of a relatively clean surface, you can start with a medium grit like 100-150.
Can you use regular wood sandpaper on metal?
You can, but it's not ideal. Abrasives designed for metal, like aluminum oxide, zirconia, and ceramic, are tougher and more durable. Wood sandpaper will clog and wear out very quickly and be less effective.
Is it better to sand metal by hand or with a power sander?
It depends on the job. Hand sanding is best for small, detailed, or curved areas that require precision. Power sanders are far better for large, flat surfaces where you need to remove a lot of material.
Do you have to remove all rust before painting metal?
Yes. Painting over rust traps moisture and allows the corrosion to continue spreading underneath, which will cause the new paint to bubble, peel, and fail quickly. You must sand down to clean, solid metal.
How do I stop my sandpaper from clogging up when sanding aluminum?
Use an abrasive with an open-coat or a stearate coating, which is designed to resist loading. Alternatively, wet sanding with a lubricant like water is highly effective at preventing aluminum from clogging the sandpaper.
Still have questions? Call our team of experts, and we'll get you the exact product you need for your project.
Additional Resources:
- Abrasive Hardness, Toughness, and Friability Made Simple
- Cut, Grind, and Sand Cooler: How to Choose the Right Abrasives
- How to Remove Rust From Metal - From Natural DIY to Power Tools
- What is Wet Sanding / Wet Sand FAQ
- How to Wet Sand Metal Surfaces – A Step-by-Step Guide
- 7 Ways Abrasives Enhance Welding & Fabrication Part 2 -Weld Grinding Cleaning Buffing & Surface Prep
- Surface Prepping a Car for Painting
- Abrasives for Metal - Grit Cheat Sheet (IMAGE)
Last Update: 10/31/2025